Éowyn, Shieldmaiden of Rohan
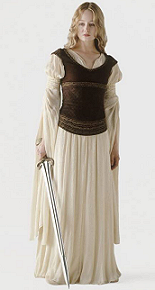
“The woman turned and went slowly into the house. As she passed the doors she turned and looked back. Grave and thoughtful was her glance, as she looked on the king with cool pity in her eyes. Very fair was her face, and her long hair was like a river of gold. Slender and tall she was in her white robe girt with silver; but strong she seemed and stern as steel, a daughter of kings.”
Since I first read the Lord of the Rings, I've always wanted to be Eowyn. She was blonde, rode horses, was basically a princess, yet was strong and brave and totally amazing. In fact, making a thrifted version of Eowyn's dress with my friends was what got me back into sewing (after my brief stint with Home Ec in 8th grade).
Back in 2011, a local theater was doing a Lord of the Rings marathon, and since we never got to dress up for the midnight premieres, myself and my two geekiest friends decided to seize the opportunity to made costumes and go for a photoshoot before sitting through the hours of awesomeness. After some serious thrifting, my awesome friend Melaine showed Amanda and I how to made sleeves out of pillowcases, and using a brown stretchy tank top and a white boho skirt, I added ribbon and trim for my own cheap version of Eowyn's iconic Shieldmaiden dress.


An elf, a shieldmaiden, and a princess walk in a forest... wait, it this some kind of joke?
(joke and pictures stolen shamelessly from Amanda)
So, when the Denver Comic-Con started to loom near, I knew exactly what I wanted to do. I wanted to remake my Eowyn dress to as close to screen-accurate as I could get it. After creating a Pinterest board and combing several tutorials and research sites (best of which was Alleycatscratch.com and CostumersGuide.com), off to Joann's I went, in search of the right fabric. After finding some nice suede that would work for Eowyn's bodice, I couldn't quite find any fabric with the right feel to it - until I happened upon some white crepe suiting that worked wonderfully.

I used Simplicity 4940, version B, but made several modifications to make it more accurate. I eventually tacked the end of the sleeves underneath so they weren't so long.

One of the main alterations was adding pintucks along the collar, a feat I only accomplished by following the lovely tutorial over at STC Crafts. I drew a straight line with tailor's chalk from the point of the collar to the dress seam, then drew parallel lines about 5/8" apart (or whatever measurement works for dividing your yoke into 5 equal lines). In case none of that made sense, here's a diagram:

I think they add depth and nice detail, don't you think?

The other main alteration I made to make it more accurate was to change the bodice. Eowyn's bodice is technically in two pieces, a brown brocade vest and a quilted lower corset.

However, even in the high quality production photos, you can't really tell it's two pieces, so I decided to only quilt the lower half. Since the idea of quilting kind of scared me, I found out that the best way to make it was to cheat trace over pre-quilted batting, which also gives the lower half extra stability.

See how I attached the side pieces before adding batting to them? Yeah, pretend I didn't do that.
For the front piece, adding the batting was easy enough, since it's all its own pattern piece. For the sides, I (should have) first attached the batting in line with the notches on the edge, then sewed the sides to the front. Don't worry too much about making it perfectly straight, since we'll be covering the edge with decorative trim.

Looks pretty good, doesn't it?
Next we'll talk about bias tape!
Bias tape is a long strip of fabric often used to finish raw edges. You can buy it at any fabric store, but you can also make your own! I wanted to match the fabric exactly, so I made my bias tape out of the leftover suede I had. There are fancy bias tape maker gadgets out there, but I just used what I had lying around.

I cut my fabric 2" thick, then cut out a 1" strip of thin cardboard and pressed the fabric on either side of the cardboard in to make single-fold bias tape.

I then added the bias tape to my raw edges and armholes, and it made everything look so pretty and professional! There are plenty of tutorials out there on how to add bias tape (my favorite is here), but basically, you pin the tape to your fabric right sides together, then sew along the crease.

Pictured: How much suede changes color in different light
Fold the tape over, then sew as close to the folded edge as possible on the other side.

There are also lots of tutorials on how to use bias tape on corners (here), if you need them. Once done, it looks like you totally knew what you were doing the whole time!
Nearly done! Here have a Judgey Cat wondering why I keep stealing her seat.

The chair is mine! My own! My... Precious!
There were only two things left to finish my beautiful Eowyn dress! I added two different types of trim to mimic the embroidery that's on Eowyn's bodice. There's a thinner version for the neckline, then thicker below the bust and around the edges.

Technically, there are three rows of embroidery on the edge, but proportionally, just one looked best for my bodice. After finishing the trim, all that was left was to add grommets to the back. The pattern has you add an invisible zipper, but grommets are more accurate and way easier in my opinion.

Pictured: Hand grommeter/ grip strengthener
After that, I just added some leather laces I already had around, and voila! My Eowyn dress was finished!

Eeek! It's so pretty!

Pepper was less than thrilled about being recruited as a dress form head
Once I added some white and gold braid to my sleeves (secured with safety pins, just in case), I was ready to head out the door on a new adventure!

A Shieldmaiden is always ready for another adventure...
Jim reprised his role as Steampunk Commander Riker, especially fitting since we both got to attend the Star Trek: The Next Generation Reunion panel, and saw Jonathan Frakes himself!

Ah, waiting in line, such a glamorous part of attending cons
Anyway, that's my tutorial! Please feel free to leave any questions or comments below, and thanks for reading!
Updated to add: I went on a photoshoot with my nerdiest friends after Christmas, and the wonderful Bruce Jenkins took some amazing pictures of me!


